
Getting Started with Adobe® Photoshop® *
Compliments of
from Dr. David Dailey's
Starting the application
1. Start Photoshop by locating it under "Programs" from the Windows start button. It can typically be found from the "Start" button, under Programs/Adobe, though in the IT lab, it is likely to be under the CPSC-applications, submenu.
If they are open (as shown above), then close up the little boxes on the
right: the "Navigator," "Colors", and "Layers" boxes.
Starting a new file 1. Start your own original "painting" by going to the "file" menu
and choosing "new" as shown below: 

3. You will then get a blank drawing surface of the size you
chose. Begin using the tools from the tool palette. Shown below
is the use of the paintbrush: ![]() , with a given foreground color and 100% opacity.
(Double-click on a tool to modify its characteristics.)
, with a given foreground color and 100% opacity.
(Double-click on a tool to modify its characteristics.)

Opening an existing file
1. Sample images from Adobe.
Adobe provides "sample" images with which you may practice. These are located within a "Samples" directory inside the Adobe Photoshop installation on your lab machine (try looking in Photoshop\Goodies\Samples). Use the Open option from the File menu and point it at one of these.
Please be aware that while these images may prove quite useful in practicing with the program, a) they are copyrighted, b) they are not your original work and c) using them as a substitute for your own work is likely to get you in trouble.

2. using public domain images.
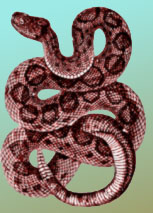
Go to http://srufaculty.sru.edu/david.dailey/public/public_domain.htm Go into the "reptiles" heading and choose "rattlesnake."
3. Use the right mouse button and copy the image into your clipboard SIZE="2">
Your screen will now look something like this:

You may now want to "zoom" in a bit (using the magnifying tool).
Now let’s play a bit:
1. Convert it to RGB (from greyscale). Go ahead and "flatten" along the way. (Listen for what this means during lecture.)

2. Select the whole image:

Little moving lines should now appear in a rectangle all around the image.
3. Copy the thing to the clipboard again just to make sure you still have a copy.
Now let’s colorize it.
4. Choose hue and saturation from the adjust option in the image menu:

5. Click the Colorize checkbox in the dialog which appears, and play with the sliders a bit:


Shrink it down to a reasonable size:
Save and display the results:

jpeg and gif versions
Other links:
case studies using Photoshop comparison of gif and jpg making and using screenshots
(9/13/06-dpd)